
Anyone working in the startup world for more than five minutes has seen this scenario play out at least once: a brilliant founder with a bold idea, a tight budget, and a sense of urgency. They’re racing to build the “perfect” product. What happens next? A bloated feature set. Burned runway. And, critically, a product that no one truly needed.
Launching a Minimum Viable Product (MVP) isn’t about doing everything. It’s about uncovering the core truth that proves your product is worth building in the first place.
If you’re a founder, especially if you’re non-technical, this guide is built for you. Over the last five and a half years, I’ve had the privilege of working alongside some of the best product minds in the game.
During that time, our team has helped build over 100 startup products using lean principles. These aren’t just projects that looked good on a pitch deck. The majority have gone on to raise VC funding or win startup awards.
That track record didn’t come from luck. Instead, it came from disciplined prioritisation, relentless validation, and a clear understanding of what truly matters at the MVP stage.
The eight steps you’ll find here aren’t theory. They’re drawn from the trenches. They’re battle-tested on real products, by real teams, under real pressure. You’ll walk away with a step-by-step playbook you can actually implement. Even if you’re building your first product. Even if you don’t have a technical co-founder. Even if you’re working with limited time and tighter funds than you’d like.
This isn’t just about building fast. It’s about building smart. Let’s dive in.
Contents
1. Define Your MVP Goals and Metrics
Before you build anything, you need to be clear on why you’re building it. Your MVP should validate a core assumption, not deliver a full-blown experience.
Start by answering this: What specific outcome do you need to prove with your MVP?
Are you testing for market demand, user engagement, or willingness to pay? Then set measurable success criteria. Think user activation, retention, or time-to-value, not vague goals like “get feedback.”
Keep it lean and focused.
Try using OKRs (Objectives and Key Results) to define what success looks like for your MVP. The “Objective” is a clearly defined goal, ambitious but achievable, that gives your team direction. The “Key Results” are measurable outcomes that show whether you’ve met that goal. They force clarity and focus by linking actions to impact.
For example, if your goal is to validate early user interest, your Objective might be: Validate that early users are willing to complete a signup flow. Then, your Key Result could be: 30%+ of visitors who land on the product page sign up within 7 days.
Think of OKRs as the bridge between intention and execution. Used correctly, they keep your MVP lean by highlighting what truly matters.
2. Deeply Understand Your Users’ Core Problems
Your product exists to solve a problem. So start with the problem, not the feature list.
Talk to real users. Not friends. Not investors. Actual people who might pay for your solution.
Start by identifying your target user segments and recruiting participants who closely match your ideal customer profile.
Use customer interviews to uncover not only what users say they want, but what they actually struggle with day to day. Ask open-ended questions like “What’s the hardest part of [doing X]?” or “Tell me about the last time you tried to solve this problem.”
To go deeper, apply the Jobs-to-Be-Done (JTBD) framework. JTBD helps you understand the ‘why’ behind user behaviour.
Rather than segmenting users by demographics or personal preferences, JTBD focuses on the core progress users are trying to make. It asks: What are users trying to accomplish when they turn to a solution like yours? What functional, emotional, or social outcomes are they aiming for?
Your job is to uncover that desired outcome and understand how your product fits into their story of progress. When you view your product as a tool for achieving that outcome, not just a set of features, you build something that resonates on a deeper level.
To use JTBD effectively:
- Identify the user’s current process for solving the problem.
- Break down the functional, emotional, and social jobs involved.
- Look for moments of friction, frustration, or unmet needs.
- Map these insights back to your product’s core value proposition.
For example, a head of operations at a growing B2B SaaS company won’t just be looking for another dashboard for the sake of it. Instead, they’re probably searching for a better way to track critical KPIs in real time so they can confidently report to leadership. The result? Faster decision-making and fewer costly bottlenecks.
That kind of perspective often uncovers user needs that standard feature lists completely miss. This approach surfaces the real problems worth solving. Prioritise features that directly address those core jobs. Those are your painkillers.
3. Brainstorm and Create an Idea Backlog
Now it’s time to go wide.
Start by running structured brainstorming sessions with your core team. Use prompts like “What’s the simplest way we can solve the user’s problem?” or “What have users told us they wish existed?”
Encourage everyone to contribute, including non-technical team members. Don’t dismiss ideas too early. The goal here is to generate volume before applying any filters.
Pull insights from your customer interviews, JTBD analysis, competitor feature scans, and even support tickets or sales calls. If a customer mentioned a workaround they’re using, log it. If your advisor flagged an overlooked opportunity, add it. These raw insights are gold.
Organise your backlog using a simple, transparent tool like Airtable, Notion, or a simple Google Sheet.
Structure it by category (e.g., core functionality, onboarding, retention) and tag each idea with context: who suggested it, why it matters, and which user problem it supports. Use comments or a column for assumptions that each feature might help validate.
Here’s a simple example of what that might look like in a table:
| Feature Idea | Category | Suggested By | User Problem Solved | Assumption to Validate |
|---|---|---|---|---|
| Real-time dashboard | Core Functionality | Ops Lead | Difficulty tracking KPIs across tools | Users will engage more if data is real-time |
| Slack integration | Onboarding | Sales Team | New users miss key notifications | Slack alerts will reduce drop-off in week one |
| Dark mode | Retention | User Feedback | Visual strain during extended use | Users will stick around longer with this option |
Keep it simple. Your goal is visibility and shared understanding, not perfection.
If you’re unsure where to begin, try a “Feature Jam”: set a 30-minute timer, bring your team into a room (or Zoom), and have each person independently list feature ideas. Then go round-robin to share and stack them into the backlog.
This process ensures that when you move into filtering and prioritisation, you’re choosing from a pool of rich, diverse ideas, not just what came to mind first.

Do you have a brilliant startup idea that you want to bring to life?
From the product and business reasoning to streamlining your MVP to the most important features, our team of product experts and ex-startup founders can help you bring your vision to life.
4. Rapidly Assess and Filter Ideas
Once your backlog is full, it’s time to filter hard. Ruthlessly.
Begin by asking two foundational questions for each idea:
- Does this feature help validate one of our core MVP assumptions?
- Is it absolutely necessary for the user to complete the main journey?
If the answer is no to both, cut it. It can always be revisited later once the MVP is in the wild.
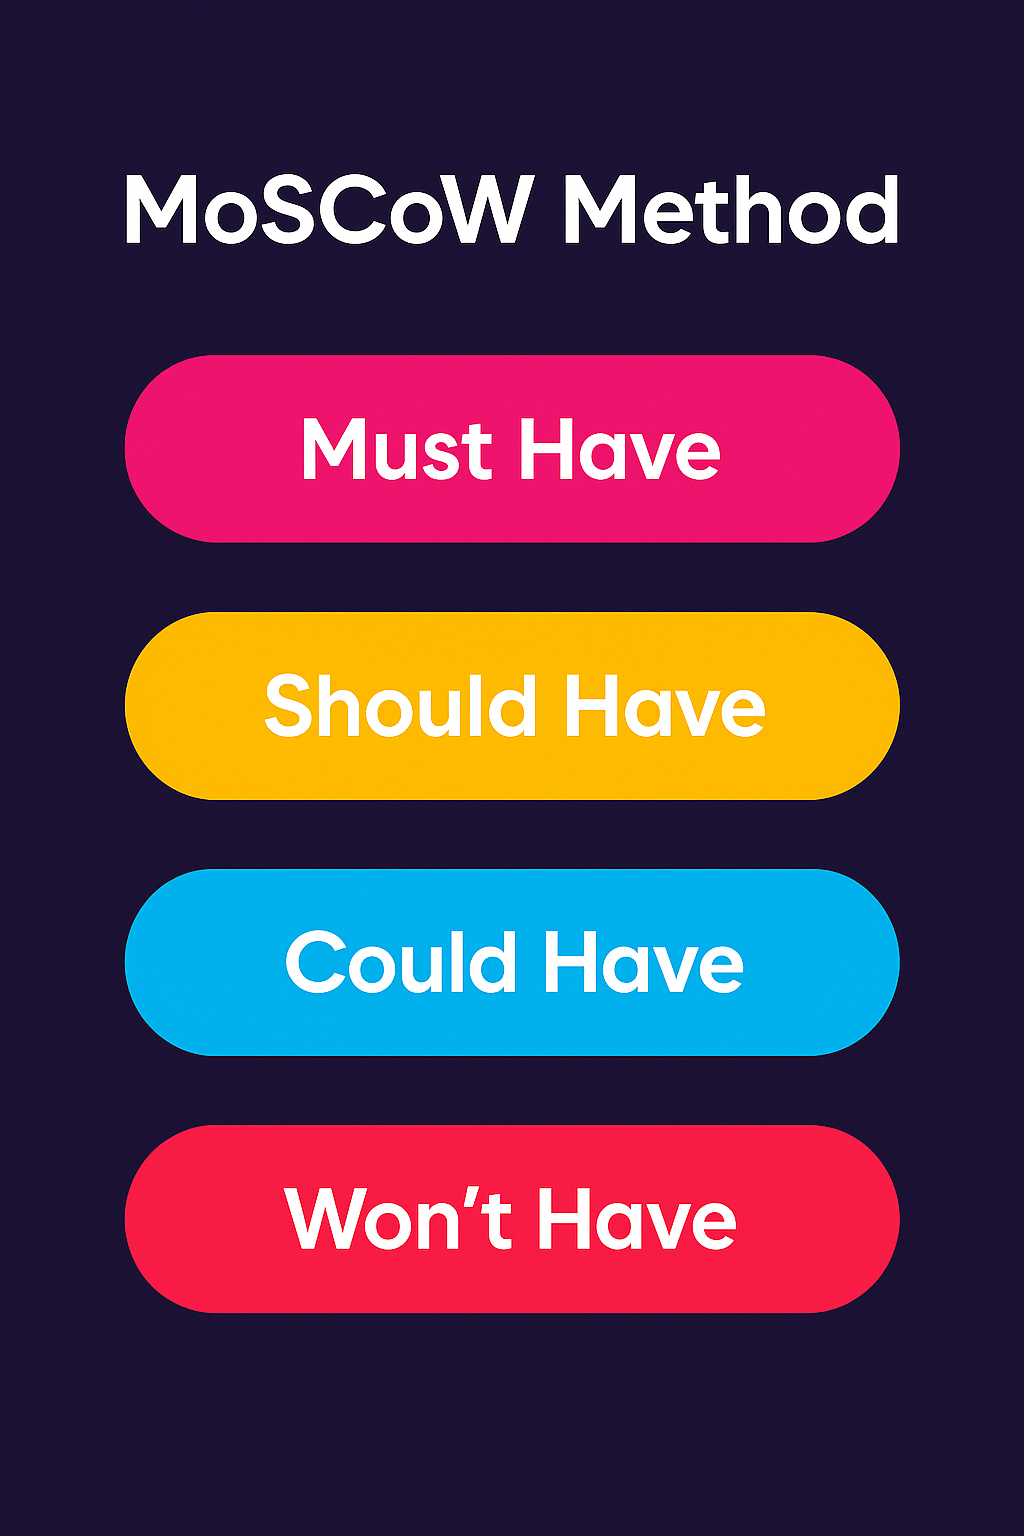
MoSCoW Method for Prioritisation
To add structure, apply the MoSCoW Method, a prioritisation technique that helps you categorise features based on their necessity for your MVP. It breaks your list down into four categories:
Must Have
These are non-negotiable. Without them, your MVP cannot function or deliver its core value. Think of these as the baseline features your product needs to be viable. For example, a payment feature in a marketplace MVP or a login function in a private user platform.
Should Have
Important but not essential for the initial launch. For example, an analytics dashboard might be helpful for power users or internal decision-making, but if your MVP’s core goal is to validate user engagement through a simpler metric, it can wait.
These features enhance the experience or add depth, but aren’t required to deliver your primary value proposition. If you’re on a tight deadline or have limited resources, this is where you should make your first cuts, so you can focus on what truly moves the needle.
Could Have
These are the features that stakeholders often get excited about (polish, convenience, or differentiators), but they don’t meaningfully impact the product’s ability to test your key assumptions.
For example, a dark mode setting, animated microinteractions, or elaborate user profile customisations may look impressive, but they rarely influence whether your product delivers on its core promise. Often, these become distractions if not consciously deprioritised.
Won’t Have (for now)
This category is about focus. These are features you’re explicitly saying “not right now” to. It doesn’t mean they’ll never be built, it just means they’re not part of this MVP cycle.
For example, if your goal is to validate core user engagement with a single key workflow, you might defer a user referral program or custom reporting features until later.
These can add value down the line, but would only distract your team right now. Documenting these helps you acknowledge ideas without letting them creep into scope, which keeps your MVP focused and your roadmap honest.
How to Implement the MoSCoW Method
- Align on your MVP’s core assumptions and user journey first.
- Go through your feature backlog as a team, placing each idea into one of the four categories.
- Use a visual tool (e.g. Miro, FigJam, or a Kanban board in Notion, etc.) to drag and drop features into columns.
- Sense-check the list by asking: “If we shipped only the Must Haves, would the MVP still be functional and meaningful to users?”
This framework works best when used collaboratively and consistently. Keep revisiting it as you move through development, especially if new ideas start to emerge or scope begins to creep.
Create a scoring column in your backlog where each team member quickly labels features using MoSCoW. Then, hold a short review meeting to resolve any conflicts. Doing this collaboratively keeps everyone aligned and prevents pet features from sneaking in.
Layer in the YAGNI principle (You Aren’t Gonna Need It) to challenge scope creep. If a feature isn’t helping you prove a key assumption or delivering immediate user value, it’s likely a distraction.
For added rigour, use a “Feature Filter Checklist.” For each feature, ask:
- Is it tied to a measurable goal?
- Will a user be disappointed if it’s missing?
- Does it increase or reduce development complexity?
The goal is to trim ruthlessly without losing your core value. Simpler MVPs are faster to build, easier to test, and more likely to generate clear learning.
5. Prioritise with Proven Frameworks
Once you’ve filtered down your features, it’s time to prioritise them with structure and clarity. Here are three widely used frameworks that bring objectivity and speed to the decision-making process.
RICE Framework
The RICE framework stands for Reach, Impact, Confidence, and Effort. Each feature is scored using these criteria:
- Reach: How many users will this feature affect within a given timeframe?
- Impact: How strongly will this feature influence your core goal (e.g., activation, retention)?
- Confidence: How sure are you about your Reach and Impact estimates? (Expressed as a percentage.)
- Effort: How much time (in person-days or person-weeks) will it take to build this?
The formula: (Reach × Impact × Confidence) ÷ Effort
This gives you a numerical score for each feature. Prioritise the ones with the highest scores.
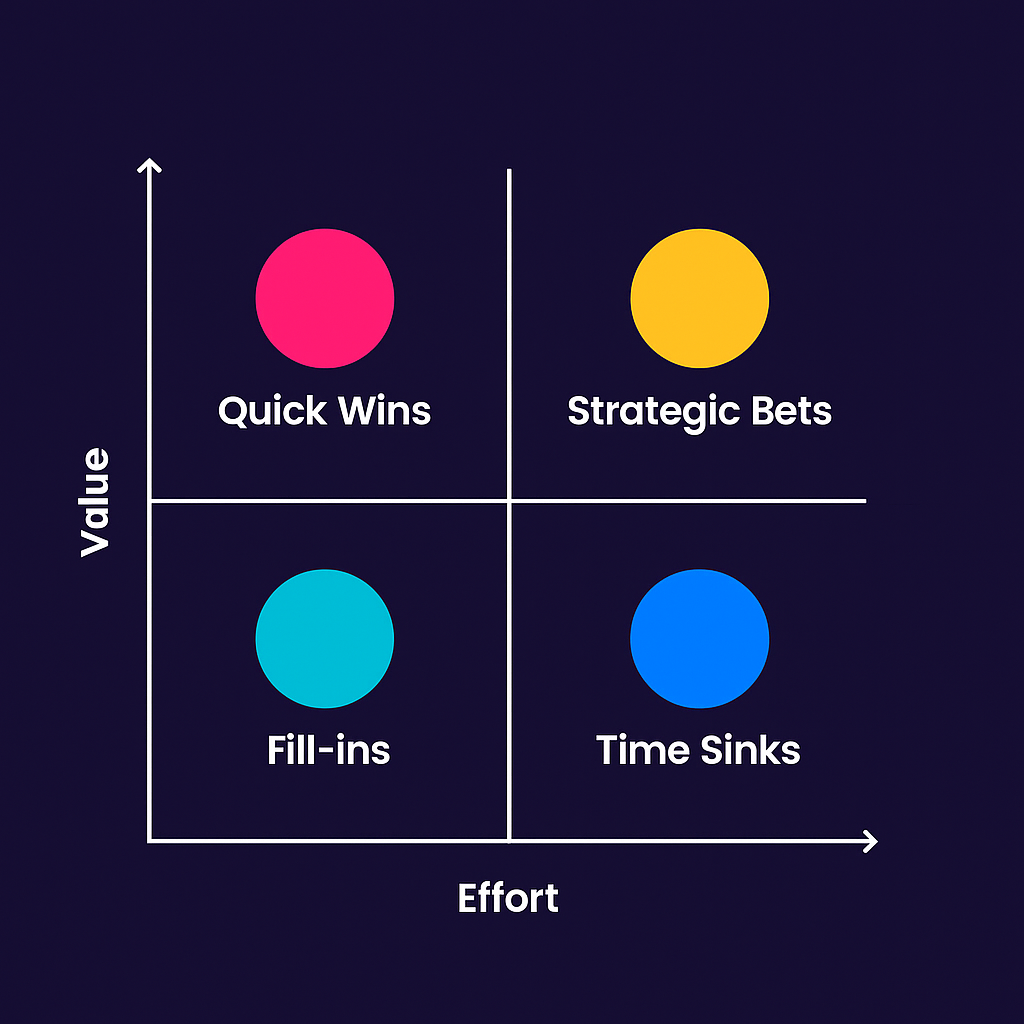
Value vs. Effort Matrix
This Value vs. Effort Matrix is a visual tool that helps teams quickly segment features into four buckets:
- Quick Wins: High value, low effort. Build these first.
- Strategic Bets: High value, high effort. Plan for these.
- Fill-ins: Low value, low effort. Consider if resources allow.
- Time Sinks: Low value, high effort. Avoid or delay.
Plotting your backlog on a simple two-axis graph during a team workshop allows for consensus building and reveals mismatches in perceived effort vs value.
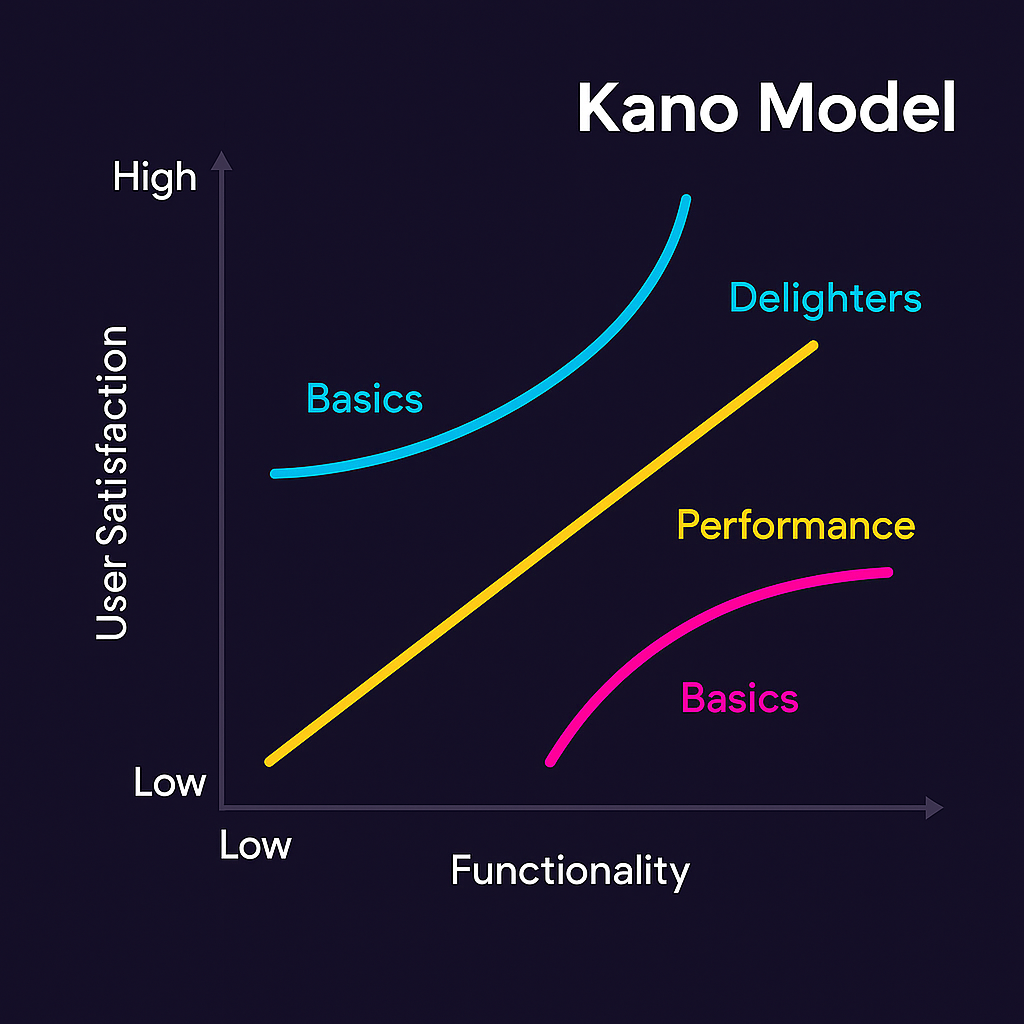
Kano Model
The Kano Model is great for understanding how different features influence user satisfaction:
- Basic Needs: Users expect these by default. Missing them causes frustration, but delivering them doesn’t excite.
- Performance Features: The more you improve these, the more satisfaction you create.
- Delighters: Unexpected features that make users say “wow.” Not required, but can set you apart.
Use customer feedback, surveys, or even team intuition to sort your features into these three buckets. Then combine this with your MVP goals to ensure you’re not overinvesting in Delighters too early.
Founder Tip
Run a prioritisation workshop with your team. Use RICE to score individually, Value-Effort to visualise as a group, and Kano to challenge assumptions around user delight. This triple-layered approach ensures you’re making well-rounded, data-informed decisions while also aligning your team fast.
6. Consider Technical Feasibility & Dependencies
Some features may seem simple on the surface, but can introduce significant technical complexity. Founders without a technical background often underestimate these risks, which can derail timelines and budgets.
If you already have a technical co-founder or advisor, involve them early. Ask them to flag:
- Infrastructure considerations (e.g. cloud hosting, security, scalability)
- Platform-specific constraints (e.g. mobile OS limitations)
- Integration dependencies (e.g. third-party APIs or payment providers)
- Hidden costs or time sinks in implementation (e.g. custom admin panels or real-time features)
For non-technical founders without an internal tech lead, we strongly recommend partnering with a trusted technical advisor or fractional CTO. They can help translate product ideas into technical requirements and guide early build vs. buy decisions.
Not sure where to start? Our team works with non-technical founders every day. Feel free to reach out for a feasibility review or a second opinion on your MVP scope. It’s better to pressure test early than rework later.
As a practical next step, run a “Tech Reality Check” session for your “Must Have” features. List each one and ask:
- What technologies are required to build this?
- What are the main risks or blockers?
- How confident are we in estimating time/cost?
This upfront diligence can save you weeks, if not months, down the road.
7. Prototype, Validate, and Iterate Quickly
Don’t wait months before showing your product to users. Start small, build fast, and test early.
If you’re just trying to validate an idea or simulate user flows, lightweight tools like Webflow, Glide, or Bubble can help you prototype quickly. That said, be careful not to rely on no-code for anything beyond validation, especially if scalability, data security, or long-term flexibility is important.
For production-ready builds, consult a technical advisor or development partner to assess the right tech path for your goals. You can also use clickable wireframes (Figma, Marvel) or even slide decks to create a prototype that communicates your product’s core value.
The goal isn’t polish, it’s proof. You’re trying to validate assumptions, not impress users with design.
Once you have something basic, get it in front of users. Recruit early adopters through your network, communities, or beta waitlists. Then run usability sessions and track real usage. Focus on behaviour more than feedback; a user’s actions tell you more than what they say.
Now, apply the Build-Measure-Learn loop:
Build
Create a small testable version of a feature or workflow. This could be:
- A landing page that collects emails
- A basic onboarding flow
- A single feature inside a no-code prototype
Measure
Decide what metric proves the assumption you’re testing. Use analytics tools like Mixpanel, Heap, or Google Analytics to track:
- Conversion rates (e.g., sign-ups, feature usage)
- Activation milestones (e.g., first task completed)
- Retention over days or weeks
- Time-to-value (how quickly users achieve success)
Learn
Interpret the data: Did the feature deliver the value you expected? What surprised users? Where did they drop off? From here, adjust your assumptions, tweak the product, and go again.
This is not a one-time cycle. It’s continuous. Each iteration should be small and fast. Keep loops tight. You should be looking at, ideally, one iteration per week.

Bonus Tip
Create a simple “experiment board” (Notion works well). For each test, list the hypothesis, what you’ll build, how you’ll measure, and what you learned. This builds a learning culture into your product process.
Remember: MVPs succeed not because they’re perfect, but because they learn faster than the competition.
Whether you’re prototyping a new idea or iterating on a feature that’s already live, the Build-Measure-Learn loop keeps your team grounded in evidence. Use it to stay lean, stay focused, and continuously move closer to product-market fit.
8. Communicate and Align Stakeholders
Just because your team is aligned doesn’t mean your investors, advisors, or external stakeholders are. Clear and proactive communication is essential, not only to justify what you’re building, but also to explain what you’re not building yet and why.
Start by preparing a lightweight communication toolkit:
- A one-page product strategy brief outlining your MVP goal, assumptions, and success metrics
- A visual roadmap (tools like Productboard, Miro, or even a shared Google Slides can work)
- A prioritisation matrix that explains your rationale using a framework like MoSCoW or RICE
Schedule regular stakeholder syncs. Monthly is ideal for early-stage startups. Use these sessions to:
- Recap your progress using measurable outcomes
- Reiterate your prioritisation logic and any new learnings
- Explain trade-offs or feature deferrals with clarity
- Share what’s next, including any experiments, prototypes, or roadmap updates
Most importantly, make room for feedback. Stakeholders often bring valuable context, whether it’s investor expectations, customer signals, or strategic risks.
Bonus Tip
Use a simple slide format to report progress: “What we built,” “What we learned,” “What we’re prioritising next,” and “Why.” This reinforces transparency and makes it easier to secure ongoing support.
If you want outside eyes on your roadmap or need help turning product decisions into clear narratives, our team is always open for a chat.
From Prioritisation to Production: What Comes Next?
By now, you’ve clarified your MVP’s purpose, identified your core features, validated your assumptions, and structured your build priorities. That’s a massive step forward, but it’s only half the journey.
Because here’s the truth: even the smartest prioritisation won’t get you far if you don’t know how to build what matters, in a way that’s fast, lean, and scalable.
The next phase is about execution, turning your prioritised list into a functional MVP that your users can actually touch, test, and respond to. It’s where early traction is won or lost.
That’s why our CEO and Product Jedi, Daniel, has a guide that breaks down the 3 essential steps to actually building your MVP:
- Step 1: Define your MVP’s Value Proposition—the cornerstone of your product’s reason to exist
- Step 2: Set the Key Assumptions You Need to Validate—so you don’t waste months chasing the wrong thing
- Step 3: Map the Shortest Path to Prove Them—with real, buildable, testable solutions
He even walks through how Airbnb approached their MVP in its earliest form, and how you can apply the same thinking to your own product.
You can find the full guide here.
If you want to go beyond spreadsheets, sticky notes, and wireframes and start building something functional, focused, and fundable, this is your next step.
Sign up for our newsletter
Join hundreds of entrepreneurs and business leaders to receive
fresh, actionable tech and startup related insights and tips
Conclusion: Prioritisation is a Practice, Not a One-Time Decision
Feature prioritisation isn’t a checklist. Rather, it’s a repeatable practice rooted in clarity, discipline, and user-centric thinking. When done right, it ensures you’re not just building quickly, but building the right things quickly.
Here’s a quick recap to help you take action:
- Set clear MVP goals and OKRs: Define what success looks like before you write a single line of code.
- Understand your users deeply: Conduct interviews and use JTBD to pinpoint their real pain points.
- Capture and centralise ideas: Create an idea backlog with context and input from across your network.
- Filter with purpose: Apply the MoSCoW method and YAGNI principle to strip away non-essentials.
- Prioritise with structure: Use RICE, the Value-Effort Matrix, and the Kano Model to make confident decisions.
- Involve tech early: If you’re non-technical, bring in a trusted advisor (or talk to our team) to assess feasibility.
- Test and learn fast: Prototype lean, track user behaviour, and iterate with the Build-Measure-Learn loop.
- Keep everyone aligned: Use roadmaps, briefs, and structured updates to bring your team and stakeholders with you.
And critically, once you’ve nailed prioritisation, you need to focus on execution. That means building a lean, functional MVP that’s capable of delivering value and learning in the real world.
Your MVP is not the end goal, it’s a vehicle for validation. Build it to learn, not to launch. And remember: prioritisation doesn’t stop once you ship. It evolves with every new insight.
Make each decision count.
Thanks for reading.